Tutorial 13: Flowcharts to Navigation - Structuring Presentations
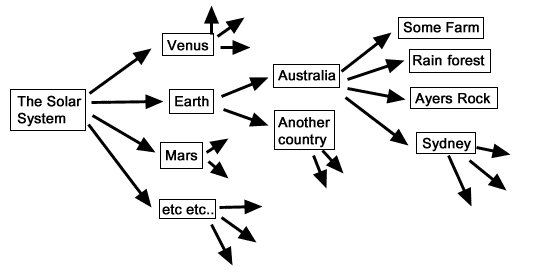
In the previous tutorial, you created a linear structure, forward and back along a straight line. This tutorial uses the hierarchical/tree type structure.When creating a complex presentation, it is a good idea to create a flowchart diagram which illustrates the navigational structure of your presentation. The diagram below shows the flowchart diagram for this tutorial. Assume we are building a presentation about the universe. We can start with a main menu at our solar system level. The user can choose a planet that will take him/her to a submenu giving further choices that can branch off into even more subcategories.

We will only be building part of the above presentation. Copy earth.dir and australia.dir to your local hard drive. Open earth.dir and look at what's in the movie. This movie represents the second level of the above flowchart diagram. We assume we have moved from the solar system 'main' menu to our selection of planet earth.
We now want to click a country on the globe (the best one) and go to that location. In some situations (like this one), you may want only part an image to be linked instead of the whole graphic. We can use invisible buttons. Invisible buttons aren't magical objects but simply shape cast members with an invisible border.
Creating Invisible buttons
- Click on frame 1 of channel 4.
- Open the Tool Palette.
- Click on the no line button.

- Click on the rectangle button and draw a rectangle
on the Stage around the Australia part of the earth image.
- Right-click on this sprite, choose script from
the menu and then add
on mouseUp me
play movie "australia"
end - Insert a Hold on Frame behavior at frame 10. Save the movie, play it and click over the Australia part of the image.
Creating Shared cast libraries
When you develop a detailed presentation, it is a good idea to separate your work into smaller movies and link them using scripts, as shown above. This is a better for of memory management. Your computer will load small pieces of information at a time and will result in the presentation running much more efficiently. Often, you may use the same image in different parts of your presentation (such as interface buttons), which may appear in separate Director movies. Instead of having the cast member duplicated in each movie, you can place it into a shared cast file that multiple movies can access.- Open earth.dir and open the cast window.
- Click on the choose cast icon in the top left hand
corner of the Cast Window
 .
.
- Choose New Cast from the menu. a window will appear, give your new cast a name (you can choose your own name), click on External, and make sure the Use in Current Movie option is checked.
- You will now have 2 cast windows. Click and drag the pause script
from the internal cast to cell 1 in your new cast window. Choose
File>Save and give the filename the same name as your
cast name.
- Open movie australia.dir. We are now going to link
the external cast we just created to this movie. There are 2 ways
you can do this:
a) Go to File>Open and open the cast file. You will notice this cast window is in a different colour to your internal cast, indicating it is not linked to the current movie. Click on the pause script cast member and drag it into your score. A window will pop up asking you if you want to link the external cast file to the current movie or just create a copy of the cast into the internal cast. Click Link the Cast to the Movie.
b) Revert to your initial movie. Choose Modify>Movie>Casts, press the link button and locate your cast file. This window can be used to remove linked casts as well..
Back to the Back Button
- Once you have linked the shared cast file to australia.dir,
place the Hold on Frame behavior into frame 10 of the scripting channel
- Right click on the 'back' button sprite on the Stage, choose script from
the menu and then add
on mouseUp me
play done
end
- To make this image behave more like a button, click on the sprite/cast and then choose Modify>Cast Member>Properties, then click on the Highlight when Clicked option.
- Save the movie. Open earth.dir and follow the links you created. You will notice that the back button now links the movie back to the original location, and its also highlights when clicked.
This completes the 'beginner-level' tutorials. Hope you enjoyed them. If you feel confident, move the the next level of Lingo scripting.

