

Tutorial 5: The Waving Woman - Creating new image cast members
- Open movie tut5a.dir. Save this file to your account by right clicking the link.
To save time, cast members have been imported and placed on the Stage.
- Double click cast member 4 to open it in the Paint window. You
may notice a cross by the elbow. We will be using that later.
- Point to the selection rectangle,
 and hold down the mouse button to display the pull-down menu. Make
sure Shrink is selected.
and hold down the mouse button to display the pull-down menu. Make
sure Shrink is selected.
- Drag a box around the arm to select it.
- Click the Free Rotate button
 at the top of the window. Click one of the anchor points of the
rectangle (at the corners) and rotate the rectangle 90 degrees clockwise.
at the top of the window. Click one of the anchor points of the
rectangle (at the corners) and rotate the rectangle 90 degrees clockwise.
- We are now going to use Director’s Auto Distort to generate the
sequence of in-between cast members. Auto Distort would work for
any of the features on the paint window effect toolbar.
Choose Auto Distort from the Xtras menu. A window pops up asking how many in-between members you would like Director to generate. Type in 5 and click the Begin button.
- Close the Paint window. Notice we now have 6 cast members of the
arm rotating.
- Select the 6 arm cast members - click on the first, then while
holding down Shift, click on the last.
- Click on frame 2 in channel 2, and choose Modify > Cast
to Time.
- Change the ink effect of this sprite to Background Transparent.
Notice how this makes the white part of the arm transparent. Ink effects describe transparencies within sprites. Ink effects allow a range of transparencies and colour distortions of graphic members. Most apply only to bitmap/paint members.
Changing colour depth of images in Director
- Select all the arm cast members in the cast window.
- Choose Modify > Transform Bitmap.
- Change the colour depth to 8 bits and the palette
to 3:arm palette.
The arm palette was created outside Director and imported with the original arm image. The image was changed to 16 bit because Director does not distort 8 bit images very well.
Setting registration points
When you import images, Director places a registration point at the centre of the image. This works fine when you are dealing with cast members that are the same size, but that’s not always the case as with our set of arms. The solution is to move the registration point to a part of the image that remains in the same place throughout the animation.
- Double click cast member 4 to display it in the paint window.
- Click the Registration Point button.

Two intersecting lines appear in the paint window. The point where they intersect is the registration point. Notice the registration point has been set to the bottom of the elbow, where a little cross has been drawn. Zoom into that area to get a closer look. - Move through the other arm cast members and drag the crosshair to the cross at the elbow.
Aligning Sprites
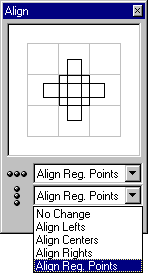
When you place cast members directly into the score, Director aligns their registration point to the centre of the stage. Now we will position sprites in relation to other sprites on the stage.
- In the score we have two sprites in channel 2. In frame 1, we have a sprite of the woman's arm and in frames 2 to 8, we have the animated arm. Select the animated arm sprite (frames 2 to 8, channel 2) and then press Shift and click frame 1 in the same channel. This selects both sprites.
- Choose Modify > Align.
- The Align window appears. Choose Align Reg. Points for both the horizontal and vertical align options and then
click Align.
Director aligns all sprites in relation to the last sprite selected, which in our case was a sprite already positioned correctly.
Extending the animation and adding a trails effect
- Delete frame 1 in channel 2, and move the arm sequence to frame
1.
- Copy and paste the arm sequence in
channel 2 until the animation continues to frame 30.
- Use the reverse sequence option from the last tutorial
to reverse the every second sequence.
- Drag the end of the sprite in channel 1 to frame 30.
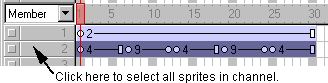
- Select all the sprites in channel 2 ?you can do this with one
click by clicking the channel number.
Click on the Trails button in the score.
Rewind and play the movie.
One last little cleanup task before you can notch up another Director tutorial to your belt.
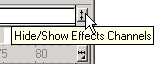
- Expand the Score so you can see the Effects Channels by clicking
on the Hide/Show Effects Channels button at the right
end of your Score window.
- You will notice that there a few sprites in the palette channel. When you drag an image cast member to the stage/score Director automatically places its palette in the palette channel. If you have more than one image in a frame with different palettes, a conflict can occur, causing colour problems. Select all the palette sprites and delete them.
Now would be a great time to save your movie - tut5.dir is a good
name.
You can see the completed Tutorial 5 here tut5a_fin.dir
Adding sound
- Open tut5.dir -if it's not already open.
- Import g_day.wav.
- Drag the sound cast to one of the sound channels in the score.
- Rewind and play the movie.
Playing the sound file before continuing
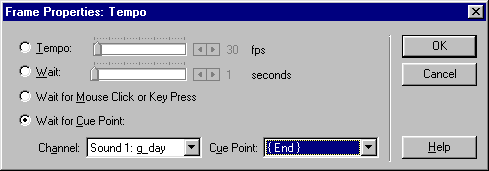
- Double click the tempo channel in frame 1.
- In the Frame Properties: Tempo dialog box, select Wait for Cue Point, make sure Sound 1: g_day is selected in the Channel, and select End under Cue
Points, and click OK.
- Rewind and play to see (and hear) how the tempo settings work.
Adding simple interaction
- Change the starting frame of the sound sprite to frame 2.
- Double click the tempo channel in frame 1.
- Select the Wait for Mouse Click or Key Press option, and click OK.
- Rewind and play the movie. Notice on frame 1 a flashing cursor appears.
- Click on the screen and see what happens.
- Play the movie again and this time press any key and see what happens.
Creating a Projector
- If you have not already saved your movie, save it as tut8b.dir
- Choose File > Create Projector
- Select tut8b.dir and click the Add button.
Director transfers the name to the list of files to be included in the projector, you can insert multiple movies into a projector, but you would generally avoid that. - Click the Options button.
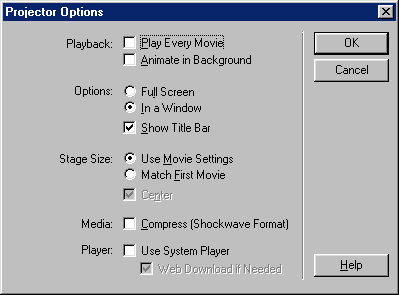
- A window will pop up giving you options for how your movie will
be saved. Select In a Window, Show Title Bar under Options and Use Movie Settings under Stage Size.
Full Screen would make your projector take over the entire screen of your computer when it plays, instead of a window. - Click OK, then Create. Give your projector
a name and click Save.
Director takes a few moments to create the projector. The projector and the movie are separate files; the movie is preserved when the projector is created. Projectors are self-executable objects. They can be played without Director required to be installed on the computer. They can only be played, you cannot edit a projector.
- Close Director and play your projector.
You have just completed your first multimedia piece. Congratulations!:)
You can see the completed Tutorial 5b on tut5b.exe