
Tutorial 1: The Bouncing Ball - Animating objects along a path
We will start by creating a new movie and setting the Stage size.
1. Start a New movie: File > New > Movie (Shortcut
= Ctrl+N)
2. Choose Modify > Movie > Properties.
In Stage size, choose 640 x 480.
Note the other properties that can be changed.
 We are now going to create a ball, using a the vector shape tool.
3. Choose Window > Vector Shape (Shortcut
= Ctrl+Shift+V)
4. Click the filled ellipse button.
5. Draw an ellipse (circle) about the size of the Vector
Shape Window - don't worry about being exact, we will be changing
the size of it later.
6. Click on the Gradient fill button ![]() .
This fills the ellipse with the default colours, which happen
to be a light grey to red (unless someone has changed it on
your computer).
.
This fills the ellipse with the default colours, which happen
to be a light grey to red (unless someone has changed it on
your computer).
7. To change the colours, click the colour box on the left
side of the Gradient colour control and choose a sky
blue from the colour menu (just a colour that I like). You will notice
the Fill colour chip changes colour to your selection.
8. Change the Gradient Type pull-down menu at
the top of your window from Linear to Radial.
9. Change the Stroke Colour to white - notice
how the outline of the ellipse disappears.
We are now going to change a few other properties of this ellipse
- for us to compare these changes, we will make a copy of this cast
member.
10. Close the Vector Shape window.
11. In the Cast Window, select the ellipse. Choose Edit
> Duplicate (Shortcut = Ctrl+D). By doing this we created
a copy (or duplicate) of the cast member in the next available cast
slot. (We could have duplicated the vector cast member while it was
open in the Vector Shape Window too.) Double click the new cast, which
opens it in the Vector Shape Tool.
12. Change the Cycles to 3 and the Spread to 200. (Again just some numbers I happen to like.) Click the Previous
Cast button ![]() and compare the 2 ellipses. Experiment with different cycles and spreads
to get an idea of what they mean.
and compare the 2 ellipses. Experiment with different cycles and spreads
to get an idea of what they mean.
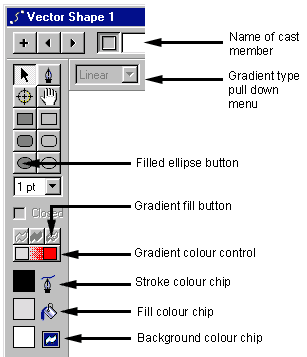
13. Name the latest ellipse to 'bouncing ball' - this
can either be done in the Vector Shape window or the Cast Member Window.
See the screenshot above to identify where the name of the cast member
appears.
Now we are going to animate the ball.
14. Drag 'bouncing ball' from the cast member window
to the Stage. You can drag and drop a cast member directly into the
Score. This will centre it on the Stage.
15. You will notice the sprite (the object that appears in
the Score) is extended over 28 frames. This is a default setting (which
can change be changed). Drag the right end of the sprite to frame
40.
16. Click anywhere in the middle of the sprite to select it.
We are now going to resize the ellipse.
17. Click on the top of the Stage window to make it active.
Press Shift and while still holding down, click on a
corner handle of the spite and drag it in to make it smaller. Holding
down Shift lets us resize the object in proportion to
its original dimensions. Resize the sprite to approximately the size
shown in diagram 2, and move it to the left side of the stage.
18. Click on frame 40 in channel 1 (the end of the sprite),
hold down shift and drag the ellipse to the right end of the Stage.
Holding down shift restricts the movement to 90 degrees. You will
notice a line being drawn on the stage - this is the animation path.
Rewind and play the movie to see what you made.
19. To curve the path, we are going to insert keyframes within the sprite. Keyframes are key points within a sprite
that identify unique properties at that location. By having different
properties at subsequent keyframes, we force Director to work out
the in-between steps (tween) and thereby create animation.
Click on frame 10 of the sprite and choose Insert > Keyframe (Shortcut = Ctrl+Alt+K). Create keyframes at frame 20 and 30.
20. You will notice at each keyframe, a circle appears within
the sprite in the Score as well as within the path shown on the Stage.
Click on the keyframe 10, and drag the circle up on the Stage. Do
the same with keyframe 30, producing a path similar to that shown
below. Rewind and play the movie.
Now would be a great time to save your movie as tut1. You can see
the completed Tutorial 1 here - tut1.dir
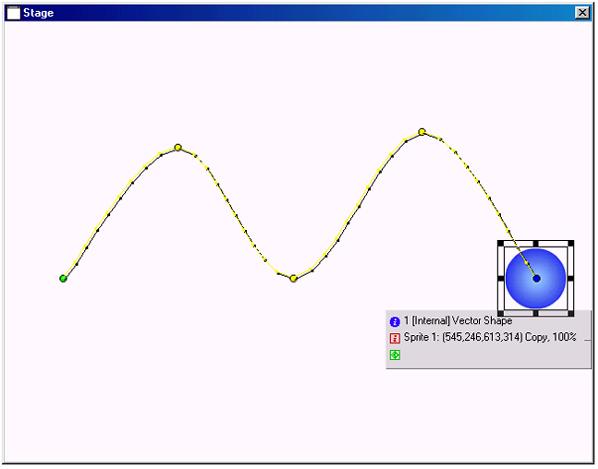
Diagram 2 - showing animation path of ball, circles on path represent
the keyframes.
You created an animation using Director's Tweening capability.
Tweening is Director's term for 'in-betweening' where you define the
sprite properties at keyframes and Director works out the in-between
steps for you. You can adjust the way Director tweens by through the Sprite Tweening Dialog Box.
1. Select the animated sprite by clicking anywhere between 2 keyframes.
2. Choose Modify > Sprite > Tweening. This
opens a dialogue box shown below.

The Sprite Tweening dialog indicates which properties are tweened
as well as how the properties are tweened. By default, the sprite
settings allow for all properties to be tweened, including sprite
size, location, rotation, among a few. We will be looking at some
of these sprite properties in later tutorials.
3. Click and drag the curvature slider to the extreme left.
You will notice the path diagram in the top left corner become more
linear.
4. Drag the curvature slider to the extreme right and and
observe how the path changes.
5. Click the Continuous at Endpoints checkbox
and notice what happens.
6. Experiment with the various curvature options and play the
movie to see how they affect the animated path of the ball.
Next we'll look at the Ease-In and Ease-Out properties
1. Delete the animating ball and recreate the ball animating
along a straight line.
2. Select the sprite and open the Sprite Tweening dialog.
3. Drag the Ease-in slider to 50%, then rewind
and play the movie.
The ball starts moving slowly and then speeds up. The animated path
shown on the indicates keyframes by circles and Directors in between
steps over each frame by dots. Normally, the dots will be evenly spaced
between keyframes. By choosing the Ease-in option, the dots are closer
together at the start of the sprite and more spread out towards the
end.
4. Experiment with various Ease-In and Ease-out settings.
You can create animation using two other techniques - Step Recording and Real-Time Recording.
Step Recording is where you work out the new position/sprite
property at each frame. By selecting the sprite and choosing Control
> Step Recording, you can step forward 1 frame using the Control Panel. At each subsequent frame a keyframe will automatically
be created, allowing you to set the new sprite properties.
Real-time Recording is where you drag the sprite around on
the Stage and Director will record the path in real-time, creating
keyframes at appropriate locations. You can access the Real-time recording
capability through Control > Real-time Recording.