
3D Text

Director 8.5 introduced real-time 3D, the kind of 3D you'll find in computer games. Creating 3D can be done in a few ways, with a modeling program like 3DS Max, from inside Director with Lingo or using the Director 3D text tool. We'll start exploring 3D by extruding text as it's the easiest.
Creating and Controlling 3D Text
1. Create a new movie of Stage size 550 x 200, background colour black.2. Open the text window and write "3D TEXT" in an interesting font of your choice. Change the font size to about 96. Format the text in white and the background in black.
3. Open the Property Inspector and under the Display field, select 3D Mode.
 4. Click on
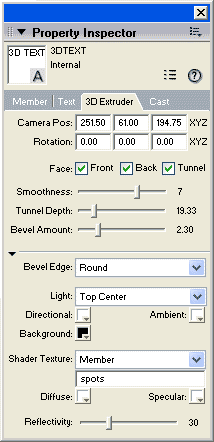
the 3D Extruder tab (shown to the left). Change the Smoothness
to 7 and the Tunnel Depth to around 20. Change the
Bevel Edge property to Round and the Bevel Amount
to 2.3.
4. Click on
the 3D Extruder tab (shown to the left). Change the Smoothness
to 7 and the Tunnel Depth to around 20. Change the
Bevel Edge property to Round and the Bevel Amount
to 2.3.
You will notice a number of other 3D properties in the Property Inspector.
We'll come back to others later.
5. Click and drag the text cast member onto the Stage. You will
see a 3D text object. Experiment with changing the Smoothness,
Tunnel Depth and Bevel values and see the difference of the
sprite on the Stage.
6. Next we'll create a texture for the text. A texture (or
map) helps define the look of a 3D surface. Open the Paint
Window and with the airbrush, create a few spurts of yellow. Call this
member spots.
7. Click on the 3D text cast member, and open the Property Inspector
on the 3D Extruder tab.
Under Shader Texture, select Member and in the field next
to it, type in spots. Press Enter and look at the text on
the Stage. It now has a texture based on the image.
8. Open the Shockwave 3D window. If the 3D text is not showing,
click the + button in the top left corner.
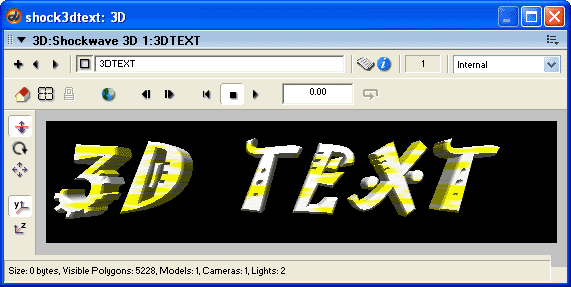
You will notice
this member contains 1 model, 1 camera and 2 lights.
On the left of the 3D member, you have a number of camera controls:
Dolly Camera ![]() zooms in and out of the text.
zooms in and out of the text.
Rotate Camera ![]() allows you
to move around the text.
allows you
to move around the text.
Pan Camera ![]() allows you to move in a straight line horizontally or vertically.
allows you to move in a straight line horizontally or vertically.
The two buttons below the camera controls allow you to fix to the Y axis
or the Z axis when using Camera Rotate.
Click and experiment with the various camera controls.
Click the Reset Camera Transform (home) button ![]() .
This resets the camera to its default or previous remembered location.
.
This resets the camera to its default or previous remembered location.
9. Use the camera control buttons to find an interesting angle
and zoom level, then click the Set Camera Transform button ![]() . This button
remembers the current camera position.
. This button
remembers the current camera position.
The Reset World button ![]() restores the 3D scene to its original state, with all models, cameras,
and so on, assuming their original positions.
restores the 3D scene to its original state, with all models, cameras,
and so on, assuming their original positions.
Animating and creating interactivity with the 3D members
Now we have created a 3D object and its appearance, we'll make it come alive with behaviors from the Library Palette10. Open the Library Palette, then click on the Library List icon
11. Click the Automatic Model Rotation icon
12. In frame 2 of the Score, create a frame behavior to pause in the frame.
on exitFrame me
go the frame
end
Rewind and play the movie.
Most 3D behaviors in the Library Palette require 2 behaviors to work, one Action and one Trigger. The Action behavior describes the way the 3D model behaves and the Trigger describes how it is activated.
13. Click on the Drag Model to Rotate icon
14. Click on the Library List icon and choose 3D > Triggers.
15. Click on the Mouse Left icon
Rewind and play the movie.
You will notice that when you click the spinning 3D text, you can drag and rotate the model. When you let go, the text continues to animate at the new rotation.
Changing 3D lighting
1. Select the 3D cast member and open the Property Inspector to the 3D Extruder tab as we did at the start of this tutorial.
2. Under Director Light, experiment with changing the direction of the light and playing the movie.
3. Experiment with changing the Directional and Ambient colour.
The finished movie can be downloaded from here.