

Real-time 3D Physics
Using Havok
![]() The
Havok Xtra provides a physics simulation mechanism for Shockwave 3D worlds.
It allows you to set up collision behavior, motion, gravity, friction, mass,
elasticity of objects, as well as other real world dynamics. A Havok cast
member is linked to a shockwave 3D cast member. It does not exist as a sprite.
Havok cast members can be created through Director or external programs like
Plasma or 3DS MAX 4-5 (with the Reactor plugin). 3DS Max 6 and higher
do not allow you to export Havok files.
The
Havok Xtra provides a physics simulation mechanism for Shockwave 3D worlds.
It allows you to set up collision behavior, motion, gravity, friction, mass,
elasticity of objects, as well as other real world dynamics. A Havok cast
member is linked to a shockwave 3D cast member. It does not exist as a sprite.
Havok cast members can be created through Director or external programs like
Plasma or 3DS MAX 4-5 (with the Reactor plugin). 3DS Max 6 and higher
do not allow you to export Havok files.
The Havok Xtra Developer Site Archive has a range of resources including demos, downloads, documentation, tutorials, and FAQ.
Note: Havok and Macromedia had an agreement to ship the Havok Xtra with the standard install of Director. This contract has ended prior to the release of Director MX 2004. This has meant that if you have Director MX 2004 +, you won't have the Havok Xtra, unless you install it yourself. From Director 11, a new Physics Xtra has been adoped - Ageia PhysX.
The Windows version of the Havok Xtra can be downloaded here. Unzip the file and place it in:
Program Files\Macromedia\Director MX 2004\Configuration\Xtras\Havok
Mac and Windows Xtra here.
Links to download the Havok behaviors:
PC Control and Setup Files Zip
Mac Control and Setup Files Sit
Unzip and place the files at (Windows):
C:\Program Files\Macromedia\Director MX 2004\Configuration\Libs\Havok
Here are links to PC Demo Behaviors and Mac Demo Behaviors.
The Havok Developers Site Archive, which had 3D demos with downloadable sources files, has gone offline. Email me if you would like a file from that resource.
Working through this tutorial
 This tutorial made up
of two parts. The first creates content with 3D Studio Max 4.3 and uses the
Reactor plugin to describe the physical properties of the models. The second
part of the tutorial involves stimulating the 3D content in Director using
the Havok Xtra. The tutorial assumes you have 3D Studio Max and the Reactor
and Shockwave 3D plugins installed. If you do not have Max or necessary plugins,
you can still work through the tutorial starting from the Director stage.
In Director, we will look at how to use the Havok Exporter file made with
Max as well as using a Havok cast member created in Director. You can find
the necessary 3D files at the start of the Director component of this tutorial.
Make sure you read through the Max section so you understand what was done.
All files used in the creation of this tutorial can be found at the bottom
of this page.
This tutorial made up
of two parts. The first creates content with 3D Studio Max 4.3 and uses the
Reactor plugin to describe the physical properties of the models. The second
part of the tutorial involves stimulating the 3D content in Director using
the Havok Xtra. The tutorial assumes you have 3D Studio Max and the Reactor
and Shockwave 3D plugins installed. If you do not have Max or necessary plugins,
you can still work through the tutorial starting from the Director stage.
In Director, we will look at how to use the Havok Exporter file made with
Max as well as using a Havok cast member created in Director. You can find
the necessary 3D files at the start of the Director component of this tutorial.
Make sure you read through the Max section so you understand what was done.
All files used in the creation of this tutorial can be found at the bottom
of this page.
Working with Reactor in 3D Studio Max
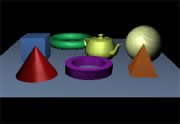
1. In Max, create a scene similar to the one I created (shown below), which includes a ground plane (made from a box rather than a plane primitive) and a number of other 3D primitives. Add an omni light to give some light the scene. You will notice that all my 3D objects are placed slightly above the ground.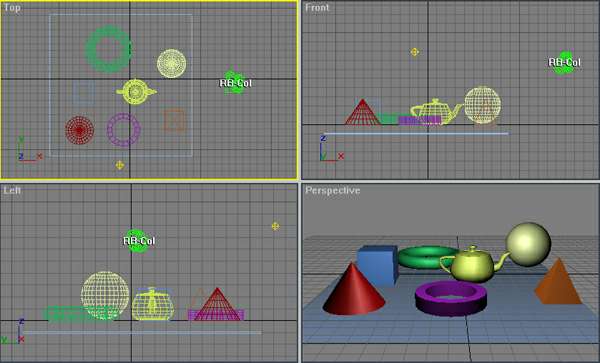
 2. Click on the Helpers Icon
 ![]() in the command panel and then select reactor in
the Helpers drop-down menu (as shown to the left).
in the command panel and then select reactor in
the Helpers drop-down menu (as shown to the left).
3. Click the RBCollection button in
the Object Type rollout.
 4. Click in any of the view planes to place your rigid
body collection symbol into your scene.
4. Click in any of the view planes to place your rigid
body collection symbol into your scene.
Once this symbol is created, you should move it away from the
other models. Its position is not important how reactor will work,
but it keeping it out of the way, will make your scene less cluttered.
5. With the collection still selected, click the Modify tab and make sure the RGBCollection Properties rollout
is expanded (as shown to the right).
6. Click the Add button, then in the dialog
box that appears, select all the models and then press Select.
You can also add models to a collection by picking them from your
3D view panes using the Pick button.
Next we will assign physical properties to our 3D world.
 7. Click the Utilities tab
 ![]() in the command panel.
in the command panel.
If the reactor button is not displayed, click on
the More button and then select reactor from the dialog box that appears. You can press the configure icon to add the reactor button to the display.
8. Expand the Properties rollout from
the reactor utility.
9. Select the ground model from any of the view panes.
Keep all the default settings for mass, elasticity and friction. When an object has a mass of 0,
reactor defines that object as fixed.
10. Under Simulation Geometry - Convex,
select the Use Bounding Box option.
11. Change the mass, elasticity and friction properties of all the other objects, varying the values for
each object.
12. When finished, click and expand the Animation
and Export rollout.
13. Click the Export to File button and
save the file as 3Dobjects.hke.
14. Export the entire scene as a shockwave 3D file saving
it as 3Dobjects.w3d. Make sure that you have the
perspective view active when exporting to shockwave 3D, as the
active pane will become the default camera view in Director.
Setting up Director
Now we’re ready to work in Director. Before we open Director, make
sure you have the Havok Xtra and Havok behaviors installed on your
computer. In the Libs folder under the Director program folder,
you should have a folder called Havok. Inside that folder
should be 2 cast files called Control.cst and Setup.cst.
If you don’t have the folder and files, you can down the file from the links below:PC Control and Setup Files Zip
Mac Control and Setup Files Sit
You can download other Havok documentation and demo files at the Havok Developers Site Archive. Once you have the Havok behaviors copied in the correct location, open Director. Open the Library Palette and you should be able to find a category called Havok.
Working with Havok in Director
Inserting a HKE file
1. Import the shockwave 3D file we created earlier. If you want
to use the one I created, you can download the 3Dobjects.w3d
file.
2. Choose Insert > Media Element > Havok Physics Scene.
A new cast member appears in the cast window with the Havok Icon. Name this
cast member EmptyHavok.
3. Place the shockwave 3D cast into channel 1 in your Score.
4. ![]() We
now have to initialise the 3D world and link it to a HKE file.
From the Library Palette, choose Havok > Setup. Select
the Havok Physics (Inserted HKE) behavior and drag it onto
the 3D sprite.
We
now have to initialise the 3D world and link it to a HKE file.
From the Library Palette, choose Havok > Setup. Select
the Havok Physics (Inserted HKE) behavior and drag it onto
the 3D sprite.
The behavior contains code defining the HKE member as containing no predefined
physics attributes. Later, we will use the Havok member created in Max,
which has defined physics of the world. For that situation, we will use
the Havok Physics (Imported HKE) behavior.
5. A dialog box appears as below. Change the settings as indicated below.
The first option links the shockwave 3D world to the Havok cast member we
just created.
Tolerance defines how much space is to be used as an invisible buffer
around the objects to be used during collisions.
Time Step is the time in milliseconds that is advanced after each
step where the positions and orientations of the 3D objects currently under
physics control. In the case of 0.03, the display will
update once each frame while the movie is playing at 30 fps.
Substeps is the number of subdivided calculations you want the system
to make between time steps. The more substeps, the more accurate the simulation
but the slower the performance will be.
World Scale is the scale of the world relative to Havok’s default
scale, which is 1 unit equaling 1 metre. The setting default setting 0.024
converts the scale to 1 inch per unit. Change it to 0.01
to be 1cm per unit.
6. From Havok > Setup, select the Make Fixed
Rigid Body behavior and drop it onto the 3D sprite. Change the settings
in the dialog box that appears, as shown below.
Which model is the model we’re defining as a fixed rigid body, in
this case the ground as we don’t want it to move.
Resitution is level of bounciness and we will keep the default
setting of 0.3.
Friction we will leave at the default too.
Type: change to Convex:Box.
7. From Havok > Setup, select the Make Moveable
Rigid Body behavior and drop it onto the 3D sprite. Change the settings
in the dialog box that appears, as shown below.
We could continue adding the Make Moveable Rigid Body behavior
to the 3D sprite defining various objects as moveable rigid bodies, but
we'll leave it with just the sphere defined as one.
8. From Havok > Control, select and drag the Move
Model behavior onto the 3D sprite, keeping all default parameters,
as shown below.
9. In the Library Palette, choose 3D > Triggers,
select and drag the Mouse Left trigger onto the sprite.
10. Make sure the Loop Playback option ![]() is pressed in the Control Panel, then play the movie. Grab the sphere and
move it around. Depending on the settings you chose in Max, the sphere
will bounce and spins to various degrees. You will notice that the sphere
can be moved through all the other 3D objects. Since they have no Havok
defined properties, no collision can be detected with them and the sphere.
is pressed in the Control Panel, then play the movie. Grab the sphere and
move it around. Depending on the settings you chose in Max, the sphere
will bounce and spins to various degrees. You will notice that the sphere
can be moved through all the other 3D objects. Since they have no Havok
defined properties, no collision can be detected with them and the sphere.
You can see the Director
file to this point here.
Importing a HKE file
1. Start a new movie and import the 3D files we created in the Max
section of this tutorial. If you want to use the ones I created, you can
download the 3Dobjects.w3d file and
the 3Dobjects.hke file.
2. ![]() From
the Library Palette, choose the Havok > Control. Select
and and drag the Havok Physics (Imported HKE) behavior onto
the 3D sprite. A dialog box appears as below. Make sure you select the 3Dobjects
cast member as the Havok reference.
From
the Library Palette, choose the Havok > Control. Select
and and drag the Havok Physics (Imported HKE) behavior onto
the 3D sprite. A dialog box appears as below. Make sure you select the 3Dobjects
cast member as the Havok reference.
3. From Havok > Control, select and drag the Move
Model behavior onto the 3D sprite, keeping all default parameters.
4. From Havok > Control, select and drag the Mouse
Left trigger onto the sprite.
5. Make sure the Loop Playback option ![]() is pressed in the Control Panel, then play the movie. Grab the 3D objects,
move them around and drop them. As the movie starts, you will see all the
objects fall slightly and land on the ground. Depending on the settings
you have used, your objects may slide along the ground.
is pressed in the Control Panel, then play the movie. Grab the 3D objects,
move them around and drop them. As the movie starts, you will see all the
objects fall slightly and land on the ground. Depending on the settings
you have used, your objects may slide along the ground.
You can download all the files from here:
3D Max file - 3Dobjects.max
Shockwave 3D file - 3Dobjects.w3d
Havok Exporter File - 3Dobjects.hke
Director file - Inserted HKE
Director file - Imported HKE